- Home
- Computer Info
- How To Upgrade RAM
How To Upgrade RAM Inside Your Device
Stephen Harrison B.Sc. (Hons), M.Sc., MBCS, CITP
Understanding how to upgrade RAM is essential to keeping your devices performing quickly and efficiently.
New computers are fast straight out of the box, but we've all probably experienced a slowing of performance over time as we install extra software, store new files like images and music, and open more tabs in our web browsers.
In addition, computer hardware wear and tear also slows down performance, just like with most other technical devices.
RAM, or Random Access Memory, is an internal hardware component that is classed a volatile. This simply means the data stored inside is not retained after you shut your device down, unlike a non-volatile hard disk drive, which stores your data permanently.
When our computers run slowly, it is often because there is insufficient memory to run all the applications, games, files and browser tabs we have open.
When a computer has no more RAM available in which to load data, it uses the hard drive to offload a portion of the RAM data in to. This creates the space available in which to load the new data in to. It is known as paging in the IT industry.
The offloaded data out of RAM is stored inside a system file, called a pagefile. This is also referred to as virtual memory in the IT industry.
Virtual memory is slower than RAM. Although this keeps your computing activity going, the performance drop is noticeable.
This is why understanding how to upgrade RAM is important, and this article walks you through the steps that you need to take to complete a memory upgrade successfully.
We look at identifying the memory your device has installed and consider how much memory you think you'll need to get your computer performing better.
We then look at a simple trick to quickly identify the maximum amount of memory your computer can handle. This is important, so you don't buy too much memory that your computer cannot use.
Next, we investigate how to choose the right type of memory for your device. RAM sticks come in all sorts of different types and sizes. Buy the wrong type of memory module, and it will either not work and maybe won't even fit inside your computer.
We then take a brief look at how to install your new module and confirm that it is being used by your computer.
Keep up with the latest news and developments
Sign up to the eComputerZ Newsletter
The free A to Z of performing BIOS updates guide that anyone can follow.
✔ A checklist of important actions to perform throughout the update process.
✔ Further supporting information to aid your update plans.
✔ My unique approach for sourcing the latest BIOS versions for any motherboard manufacturer.
Sign up below for instant access to the guide, or by going to the Subscription page for more details.
I never share information with third parties and your details are secure.
I aim to issue newsletters at the start of each month.
Contents
How To Upgrade RAM | Identifying The RAM In Your Device
Computers are usually shipped with 8Gb RAM to manage every day use such as web browsing, writing documents or even publishing web pages (cough).
The more RAM you install, the faster your computer performs. However, increasing your memory from 8 Gb to 16 Gb will not generally have such a profound effect on computing performance compared to moving from 4 Gb to 8 Gb.
If you are heavily into gaming and other resource hungry activities such as graphic design and manipulating large spreadsheets, for example, then it is worth considering buying a new computer or upgrading an existing device to at least 16 GB RAM.
This ensures a more sustained high performance over a longer period of time compared to a standard 8 GB machine.
The first step in upgrading RAM is to identify how much memory your device currently has installed, and how much of that memory is being used or consumed.
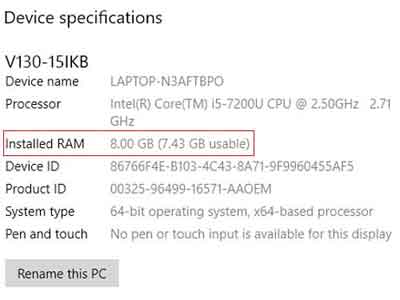
A simple way to check this in Microsoft Windows is to load the About Your PC program and check the Installed RAM details in Device Specifications section.
 How To Upgrade RAM
About Your PC - Device Specifications
As you can see from my Laptop, I have 8 GB RAM installed. However, at this stage, I do not know if 8 GB RAM is sufficient. My Laptop is performing OK most of the time. So, the next step is to see how much memory I am typically consuming.
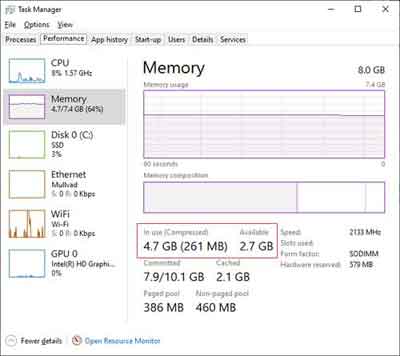
To check how much memory your machine is using, load the Task Manager in Microsoft Windows and click the Memory option on the left-hand side.
 How To Upgrade RAM
Task Manager RAM Consumption
As you can see, my Laptop is using 4.7 Gb RAM, or 64% of available memory. This is OK for the moment, but when I open graphics manipulation programs, my memory consumption drastically increases, and my Laptop's performance slows down. It therefore makes sense for me to consider upgrading the memory of this device.
Now you know how much memory is inside your device and how much it is using, the next step is to investigate how your computer RAM is physically installed. This is where we inspect the memory slots on the motherboard.
Here you could easily remove the panel on the back of the laptop, or pop the lid off the top or side of your computer, but there are other ways to answer questions such as how many memory slots does my device have in total? How many have memory modules installed and how many are free to use?
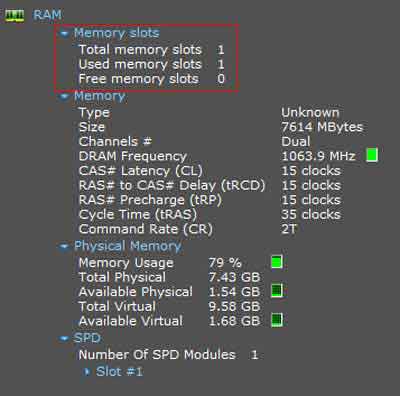
A quick way to answer these questions is to install a program such as Speccy. Once installed, simply load and select the RAM option on the left-hand side. From here, take a look at the Memory Slots information.
 How To Upgrade RAM
Memory Slot Check
As you can see, my laptop only has a single memory slot (this applies to most laptops). This by default means there is one memory slot used, and zero memory slots available to use.
To increase the memory in my laptop, I will need to buy a memory module larger than 8 GB.
It is common for computers to have four or more memory slots for memory modules to be installed in pairs, e.g. 2x pairs of 2x4 Gb modules in a 16 GB RAM device.
Installing memory modules in pairs is a recommendation for most new computers. Modern motherboards are capable of something called Duel Channel Mode, or Multichannel Memory Architecture.
This simply means that the motherboard is capable of using two channels whereby data can be loaded to and removed from the paired RAM modules. Doubling the bandwidth in this way further increases your computers performance.
In explaining how to upgrade RAM in this section, we have checked how much memory is installed in our devices, gauged how much memory our devices are using, and identified the physical capacity of our devices to accommodate additional or replacement RAM modules.
In the next section, we assess the maximum amount of memory our devices (or more specifically, the motherboards inside our devices and their operating system) can handle.
Return to the Table of Contents
How To Upgrade RAM | How Much RAM Can Your Device Use?
An important step in upgrading memory is understanding the maximum amount of RAM your device can actively use. This ensures you do not waste your money buying too much memory that will never be available to use.
Windows operating systems support 32-bit and 64-bit architecture. 32-bit operating systems are capable of using a maximum of 4 GB RAM. 64-bit operating systems are capable of using a minimum of 128 GB RAM and up to at least 2 TB (Terabyte) of RAM, depending on the operating system version.
In addition to the operating system, the manufacturer of your device's motherboard will have built in a maximum RAM consumption limit, and this limit will vary between motherboard makes and models.
32-bit and 64-bit architecture simply refers to the processor or CPU's capability of storing memory addresses (which it holds in a register). One bit in this register can reference one byte of RAM; therefore 32-bit systems can handle a maximum of (232) 4, 294, 967, 276 bytes, or 4 GB RAM.
If you have less than 4 GB RAM installed and are unsure whether you have a 32-bit operating system installed or not, take a brief look at the System Type in the About Your PC/Device Specifications section. There is no point buying 32 GB RAM if your operating system can only handle 4 GB.
Assuming your machine has more than 4 GB memory installed (and therefore has a 64-bit operating system), it is time to determine how much memory your device can handle. Below is a neat trick to do this quickly.
Press the Windows Key and the letter R at the same time and when the Run prompt appears, enter CMD and hit return to open the Command Prompt.
At the command prompt, type the following command:-
- wmic<> memphysical<>get<>maxcapacity
Note the chevrons <> represent a space
Hit return to see what the maximum figure is:-
 How To Upgrade RAM
Command Prompt Instruction And Outcome
The Max Capacity figure that is returned is in kilobytes and is simple to covert in to gigabytes. However, if maths is not your strong suit, then Google is your friend.
Simply enter "Convert KB to GB" and hit return. When the converter appears, simply copy the Max Capacity number in to the Kilobyte field, and the Gigabyte field will auto-calculate.
As you can see, my laptop is effectively capable of handing a maximum of 32 GB RAM. In explaining how to upgrade RAM, we look at the next step in the journey, which is to determine the type of memory that is compatible with your machine.
Return to the Table of Contents
How To Upgrade RAM | How To Choose The Right Type Of RAM For Your Device
At this stage, we know how much memory our machine has installed, how much is being used, how much we need, and how much our machine can handle. The next step is to work out the right type of RAM your machine is compatible with and capable of using.
Memory modules usually come is two physical styles:-
- DIMM (Dual In Line Memory Module) usually found in desktop computers
- SODIMM (Small Outline Dual In Line Memory Module) usually found in laptops
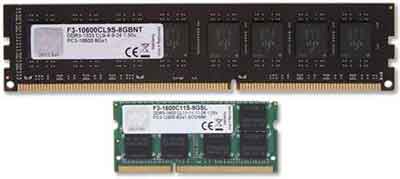 How To Upgrade RAM
DIMM And SODIMM Memory Module Examples
Unless you have an ultra-small form factor computer, which takes laptop style SODIMM memory modules, you will need DIMM memory module for your desktop PC.
Some Laptops cannot receive memory upgrades because they either do not have a convenient memory access panel on the base of the device, or the memory is soldered on to the motherboard.
If you have a Laptop, please check before you buy. Laptops without an access panel can sometime be upgraded, but it means dissembling the entire device, which should be left to the professionals.
The next step is to check the generation of DIMM or SODIMM modules that your device is compatible with. This is likely to be either DDR3 or DDR4 generations.
- DDR3 (Double Data Rate 3) is generally required for machines built before 2013
- DDR4 is general required for machines built from 2014
Each generation is faster and more efficient than the previous generation. Expect to see the DDR5 standard from 2021.
It is critical the right generation of physical RAM is purchased for your machine. Get this wrong and the memory module simply won't work, and in the case of mistaking DDR3 for a DDR4 module, it simply won't fit in the memory slot on the motherboard because the electrical contacts notch at the bottom of the RAM stick are in a different place.
To determine the generation of RAM module your devices can use, check the SPD section in Speccy.
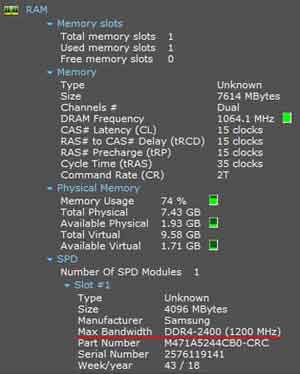 How To Upgrade RAM
Memory Type Your Device Accepts
From here, you can see that my laptop is using the DDR4 generation of RAM stick. But what do the other numbers mean?
Simply put, the 2400 (1200 MHz) numbers identify the speed at which the RAM stick operates.
Because the physical memory style is a SODIMM (Dual In Line), its speed capability is 2400 MHz - 1200 MHz per 'line'.
There are whole rafts of different memory module technical specifications such as latency and Error Correcting Codes (ECC and Non-EEC) that we not cover in this article. The majority of these additional specifications are simply not relevant to most everyday computer users.
Having said that, it is critical you do not deviate from the RAM specification identified for your machine.
Another method to identify the memory required for your machine is to use the Crucial Technology Memory Advisor Tool.
In explaining how to upgrade RAM, we take a look in the next section at the steps for installing your new memory modules inside your computer.
Return to the Table of Contents
How To Upgrade RAM | How To Install New RAM Inside Your Device
The hard work has been done, and you are in possession of your new memory modules. This step is the easy bit.
However before you start it is worth taking a look at the PC Repair Tools article, so you are properly and safely prepared for working inside your computer.
Once you are in a position to see your motherboard, you should be able to see the existing memory modules. Gently pull the plastic retention clips at the end of each module until they click and come away from the RAM stick. In some cases, the clips will partially lift the memory stick out of the slot for you.
Gently remove the old memory, and you should be left with at least one, but likely several, empty memory slots.
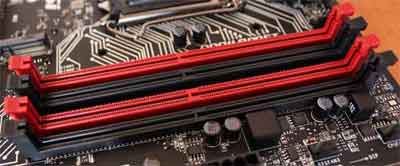 How To Upgrade RAM
Empty RAM Slots
Source:- howtogeek.com
If you are installing a pair of memory modules, it is important to put them in to the right slots, otherwise your machine could experience some performance issues.
Often these a colour coordinated, i.e. install in the red or the black slots above. If you are installing 4x memory modules of the same specification then it wouldn't matter in this instance, unless you have for example 2x 4 GB modules and 2x 8 GB modules.
Once you are clear on where the RAM sticks are to be slotted in, orientate the module so the notch aligns with the raised part of the memory slot.
Gently, with the right amount of firmness, push the memory module in to the slot until the plastic retention clips or tabs close in to or towards the notch on each side of the module.
As an additional step, I usually push the top of the memory module down at each end and in the middle to ensure it is firmly in the slot.
Next, double-check the clips are firmly positioned in to the side notches of the memory module.
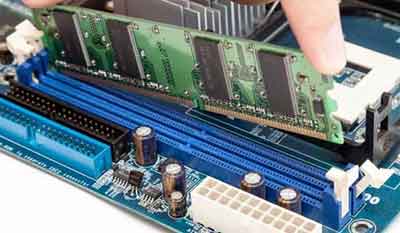 How To Upgrade RAM
Memory Installation In Action
Source:- offtek.co.uk
Once you are happy with your work, reassemble your computer chassis, plug in your peripherals such as keyboard and mouse, then power up the device.
Note the installation of Laptop SODIMM modules are slightly different to traditional computers.
SODIMMs are inserted in to the slot at an angle. When the electrical contacts are no longer visible, you can gently push the module down until it is parallel. At this point, the clips should clamp the memory stick in place.
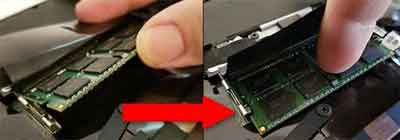 How To Upgrade RAM
SODIMM Installation In Action
Source:- howtogeek.com
Finally, when your machine has booted, check the Drive Specifications to make sure your computer actively recognizes the additional memory. You should now be good to go with hopefully a much faster performing computer.
Return to the Table of Contents
How To Upgrade RAM | Final Thoughts
I hope you understand how to upgrade RAM better now you have worked through this article.
Basic computer knowledge such as this is important to managing and maintaining your computing equipment. I will even save you money in the long term as you not have to replace your equipment as often just because it has slowed down a bit.
To support you in successfully upgrading your computer memory, take a look at the additional help below, and take a look at these comprehensive articles from How To Geek and Laptop Mag.
The video below is an excellent walk through of all the steps and considerations needed to successfully install new Random Access Memory.
The authors have kindly documented the time stamps of the video too, so you can skip the part this is relevant to you.
How To Upgrade RAM | Upgrade Your PCs RAM Video
- 0:00 - Introduction
- 0:22 - First Steps
- 1:33 - Memory Module Removal
- 2:03 - Memory Module Installation
- 2:58 - 2, 4, 6, 8 DIMM Slot Motherboards
- 3:30 - Single or Dual Channel?
- 4:10 - Running RAM in Dual Channel
- 4:41 - Using 1x Stock of RAM Only
- 4:57 - Tips for Adding More Memory
- 7:12 - Tips for Upgrading RAM
- 7:40 - Determine your RAM Type
- 8:40 - How Much Memory Should I Buy?
- 9:01 - What Speed of RAM Should I Buy?
- 10:00 - Check your Motherboards Memory Support
- 10:51 - My First PC Building Experience
- Home
- Computer Info
- How To Upgrade RAM
