- Home
- Articles | Microsoft
- Windows XP Recovery Console
Windows XP Recovery Console Tutorial
Stephen Harrison B.Sc. (Hons), M.Sc., MBCS, CITP
The Windows XP Recovery Console is an option IT professionals use to fix Windows-based computers that do not start up properly, or do not start up whatsoever.
This XP System Recovery option is considered suitable for advanced home computer users only.
IMPORTANT NOTICE
Windows XP has gone End of Life (EOL) on April 8th 2014. This means no further security patches or updates for this Operating System. My advice is to move to the latest operating system version as soon as possible.
Keep up with the latest news and developments
Sign up to the eComputerZ Newsletter
The free A to Z of performing BIOS updates guide that anyone can follow.
✔ A checklist of important actions to perform throughout the update process.
✔ Further supporting information to aid your update plans.
✔ My unique approach for sourcing the latest BIOS versions for any motherboard manufacturer.
Sign up below for instant access to the guide, or by going to the Subscription page for more details.
I never share information with third parties and your details are secure.
I aim to issue newsletters at the start of each month.
My view is usually to give it a go, and I have not strayed from this. However, it depends on your knowledge of computers whether this tool is something you want to use. The decision is ultimately up to you.
This tutorial shows you how to use the Recovery Console, and.
- What you can do first before considering this tool
- What to do if you decide to use this tool
- How to use the Console
- How to install the Console onto your computer
The Console fixes a range of low level technical problems, such as a corrupted Master Boot Record (MBR) and problematic Hard Drive sectors.
Computer's can fail to start if Malware corrupts the MBR, for example. The MBR is the starting point for your computer to load your Operating System. This happens after the BIOS completes all its checks.
FIXMBR and CHKDSK are just come of the commands that are available through the Recovery Console to resolve issues such as corrupted hard drive sectors.
Sectors are small 'compartments' of space, each holding a bit of your computer's data. Combined they result in a full Word document, operating system file or application. Billions of sectors are on today's hard drives.
This tutorial will take you through the steps to use the Recovery Console yourself, just like a professional.
The Table of Contents below breaks the tutorial down into sections, so you can jump to the part you are interested in.
Contents
What To Do Before Considering The XP Recovery Console
We shall discuss how to access the Windows XP Recovery Console in a moment.
Before considering the Windows XP System Recovery Tool, there are 5 things you should try first if your computer is not loading properly.
Each of the Windows Advanced Options are available by pressing the F8 key on your keyboard just after the BIOS information appears on your screen.
You have to be quick though because there is only a small window of opportunity to access the Advanced Menu. IT professionals press the F8 key repeatedly until the menu appears.
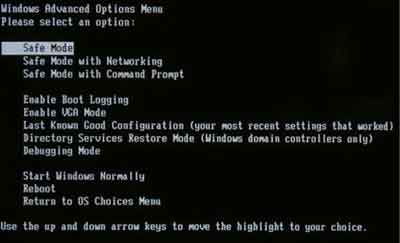 Windows XP F8 Advanced Menu Options
- Safe Mode: Loads the minimum number of drivers and services to start windows. This gives you a chance to troubleshoot your particular issues
- Safe Mode with Networking: As Safe Mode but loads required drivers to connect your computer to the Internet
- Safe Mode with Command Prompt: As Safe Mode only the Command Prompt window loads instead of your desktop (Start button, icons, etc.)
- Enable VGA Mode: Loads Windows with a basic video or graphics card driver. This is helpful if you have a problem with your display
- Last Known Good Configuration: Loads Windows with the configuration that last loaded your operating system successfully.
This option is useful if you update software or device drivers that stop your computer from loading next time
Don't forget if you can load your computer, but are still having issues, to consider using the System Restore tool.
If your computer fails to load properly, or you are unable to resolve the problem, your next step is to consider the Windows XP Recovery Console.
Return to the Table of Contents
How To Access The Recovery Console
Unless you have the Windows XP Recovery Console installed on your computer (more on this later), you need your original copy of the Windows XP CD to hand.
- Enter the CD into your CD/DVD drive and restart your computer. You should see the screen below. Press any key you want on your keyboard.
If your computer tries to load your operating system, you may need to amend the Boot Order by changing your BIOS settings.
Modern computers allow you to change the boot order by pressing the F12 key or the Del key at the BIOS stage.
Follow the on-screen instructions and put your CD Drive at Number 1 in the list.
- Your computer looks like it is going to install Windows XP again. However, when prompted, press the R Key on your keyboard to Repair a Windows XP installation using Recovery Console.
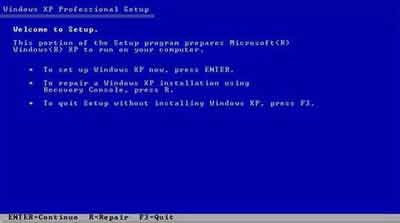 Windows XP Recovery Console Repair Option
- Next the Recovery Console loads and identifies where your Windows Operating System is installed.
Most home computer users have only one option here. Enter the Number 1 when prompted, then press the Return Key.
If you have more than one instance of Windows XP installed, select the one you are having trouble with.
You will need to know the name of the directory in which the problematic version of Windows is installed. - Next enter the Administrator Password for your computer then hit the Return Key. If you are not an administrator you will not be able to continue beyond this point.
If you never enter a password when your computers load up, you don't have an administrator password. Just hit the Return Key and this will authenticate you to access the console.
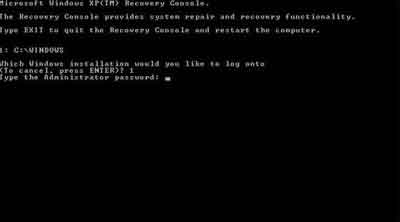 Windows XP Recovery Console Access
Return to the Table of Contents
How To Use It
The Windows XP System Console tool offers 33 commands to help with various issues you may be experiencing. I will talk you through 4 commands I use regularly when dealing with problematic computers.
- The first thing to do is type help then hit the return key.
- A list of commands appears on-screen. At the bottom of the screen, you have 2 main options:
Enter=Scroll (Line): This means pressing the Return/Key displays the next available command in the list
Space=Scroll (Page): This means pressing the Space Bar displays the rest of the available commands - At the top of the screen you have two ways to get additional help with each command:
Command-Name /?: For Example: DELETE /?
HELP Command-Name: For Example: HELP COPY
- The first command we look at is CHKDSK. This command performs an initial check of your hard disk.
- If you receive the message The volume appears to be in good condition, I advise you run the chkdsk /p command anyway to check your hard drive for errors.
I have seen the result of this scan uncover problematic hard drive sectors.
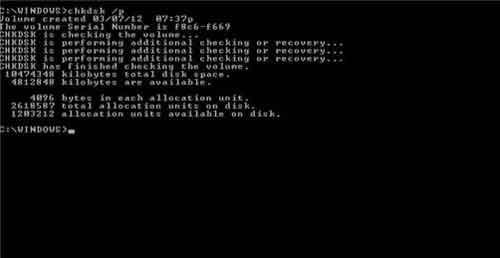 Windows XP Recovery Console
CHKDSK Command With P Switch
- When you run a couple of commands, the window can become quite cluttered. To clear all the writing from the screen, enter cls then press the return key.
- The Fixboot command repairs that part of your hard drive that starts the operating system loading process. If a Virus attacks the volume boot record, your computer will not load.
- To fix this type fixboot and hit the return key. You are prompted to confirm you want to write a new boot sector. Type Y and hit Enter.
- You then see a message on screen saying The new boot sector was successfully written.
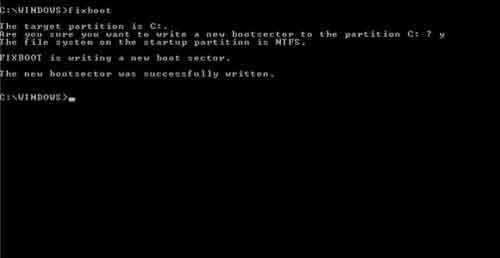 Fixboot Command Completed
- The Fixboot command has rescued plenty of computers for me over the years. On the occasions when this has failed, the Fixmbr command has come to the rescue.
Type fixmbr and press Return.
- Several warnings appear on-screen. Read them carefully then make a decision whether you want to go ahead or not.
If you are unsure refer your issue to your local computer repair shop.
If you are certain you want to continue, enter Y then press Return. A new Master Boot Record is now written to your hard drive.
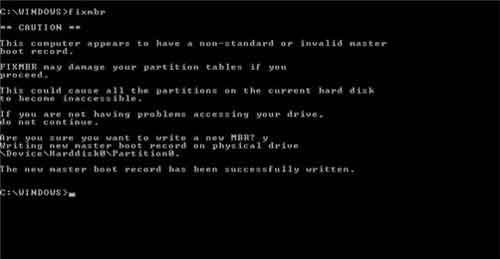 Fixmbr Command Completed
Return to the Table of Contents
How To Install It
The Windows XP Recovery Console can be installed on to your computer, so you have a choice whether to load it, or your Operating System. This is useful and convenient.
The final section of this tutorial shows you how to install the Windows XP System Recovery tool and tweak your startup and recovery options.
- Click Start > Run and type d:\i386\winnt32.exe /cmdcons. The drive letter should match your CD/DVD drive letter.
- Click the Yes button to confirm that you want to install the Recovery Console.
- The Recovery Console is installed. Wait until the process is completed.
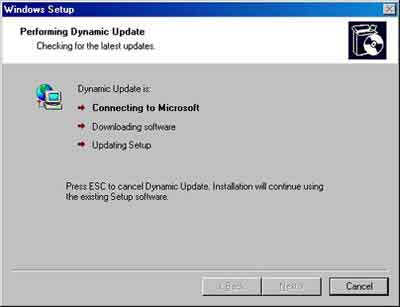 Windows XP Recovery Console
Recovery Console Install Dynamic Update
- Click the OK Button to confirm the installation process is complete.
- When you Restart Your Computer, you are presented with a choice of install options. Use your Arrow Keys to highlight which option you want to load, then press Enter.
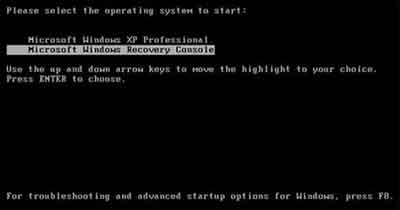 Windows XP Recovery Console
Recovery Console Install Boot Options
- Each time you switch on your computer, you will wait up to 30 seconds before your computer executes whatever option is highlighted. To shorten this wait time:
Right-Click the 'My Computer Icon' on your desktop, left click Properties from the menu, then click the Advanced tab.
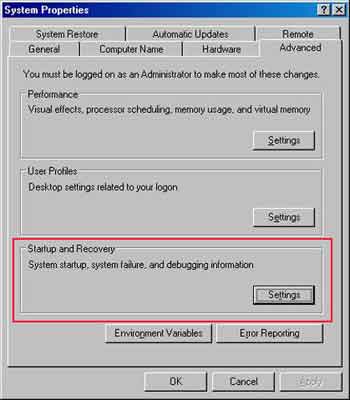 Windows XP Recovery Console
Recovery Console System Properties
- Click the Settings Button under the Startup and Recovery title. You will see the Time To display... Options set to 30 Seconds.
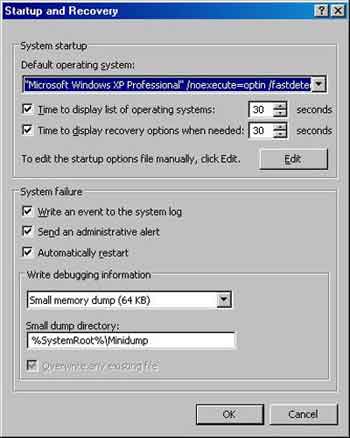 Windows XP Recovery Console
System Properties Startup And Recovery
- Change these two settings to something that is appropriate for you. I set my computer to 5 Seconds.
- The next time you start your computer, the wait time will be much shorter than before.
Return to the Table of Contents
Windows XP Recovery Console | Final Thoughts
That concludes the Windows XP Recovery Console tutorial. I hope you found it useful.
Using the console can be daunting, but this site advocates do it yourself computer repair. Give it a go. Don't be surprised by what you can achieve!
To learn more about the Windows XP Recovery Console take a look at the AskBobRankin.com article.
- Home
- Articles | Microsoft
- Windows XP Recovery Console
