- Home
- Articles | Microsoft
- Clean Install XP
Clean Install XP For Home Computer Users
Stephen Harrison B.Sc. (Hons), M.Sc., MBCS, CITP
Clean Install XP is the fourth and final part of the Windows XP Home Edition installation tutorial series.
Windows XP continues to be popular with home computer users who have not yet moved to later versions of Microsoft Windows.
This part of the tutorial looks at the finishing steps of the installation process and some recommended post-installation steps before application install.
Attention!
Windows XP has gone End of Life (EOL) on April 8th 2014. This means no further security patches or updates for this Operating System. My advice is to move to the latest operating system version as soon as possible.
Keep up with the latest news and developments
Sign up to the eComputerZ Newsletter
The free A to Z of performing BIOS updates guide that anyone can follow.
✔ A checklist of important actions to perform throughout the update process.
✔ Further supporting information to aid your update plans.
✔ My unique approach for sourcing the latest BIOS versions for any motherboard manufacturer.
Sign up below for instant access to the guide, or by going to the Subscription page for more details.
I never share information with third parties and your details are secure.
I aim to issue newsletters at the start of each month.
Part One looks at the initial prerequisite steps of the installation process.
Part Two walks you through the next batch of choices required during the installation process.
Part Three walks you through further choices to be made during the installation process, such as selecting your region and input languages.
Contents
Setting Up Your Computer
Quick Recap:- Part Three discusses the final installation steps such as whether to connect your home PC to a work group or a domain, and the auto-tuning of your monitor settings.
 Clean Install XP
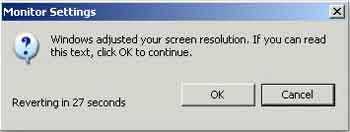
Monitor Settings
After you accept (or reject) the monitor settings, your new operating system applies those settings, then takes you through the following setup process.
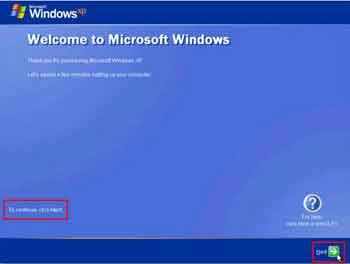
- At the Welcome To Microsoft Windows screen, click the green Next arrow to continue.
 Clean Install XP
Welcome To Microsoft Windows
- At the How will this computer connect to the Internet prompt, select the Digital Subscriber line (DSL) or Cable Modem option, or click the green Skip button to go onto the next question.
If you decide to connect your computer to the Internet at this time, you are asked another question regarding how your computer is to connect online.
Yes is the standard default answer.
Do not connect to the Internet until you have at least Microsoft Windows XP Professional SP3 installed (SP3 applies to all Editions of XP).
- Connecting to the Internet without XP SP3 installed subjects your machine to lots of malware attacks
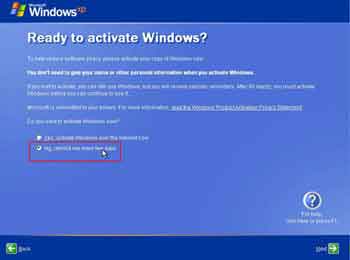
- Ready To activate Windows? You receive this screen when you configure your Internet connection. However, select the No, remind me every few days option.
Select the No option, especially if you do not have a Windows XP install CD without Service Pack 3 incorporated. You can activate later, as Microsoft gives you 30 days to do this.
 Clean Install XP
Ready to Activate Windows
- Who Will Use This Computer? This is where you can set up multiple accounts for each family member. Here they can set their own operating system customizations, such as how information is displayed.
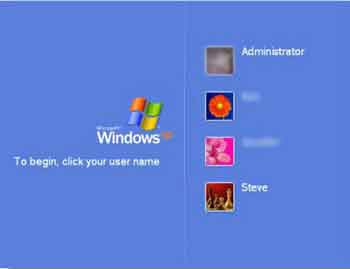
You can create up to 5 users accounts. When you boot up your computer you are prompted to select your user account, and to enter your password if one is set up.
You can always change these setting and add or remove user accounts from the Control Panel.
- Click Next then Finish. You are prompted to log in to one of the accounts you have set up. If you create no accounts you log in automatically as local administrator.
This is not advised as lots of Microsoft Vulnerabilities are exploited by local administrator rights.
 Clean Install XP
Windows XP Login Screen
Return to the Table of Contents
Post Implementation Tasks
This section of the tutorial touches on some things you should consider doing before starting to install your main applications.
- Take The XP Tour if you feel the need to, otherwise Left-Click the balloon in the System Tray and click Cancel button.
 Clean Install XP
Windows XP Tour
- Review your Device Manager and install the latest version of the device drivers you downloaded. See Part One for a reminder.
Double-check your devices (Printers, Scanners, CD/DVD drive, etc.) are working properly before continuing. - Install Microsoft Windows XP Professional SP3 (also for Home Edition) if you install CD included an earlier Service Pack. This vastly improves the security of your PC
- Install your Anti-Virus program. Update the pattern file to protect against the latest viruses when you go online (provide quick protection).
- Connect to the Internet and Activate Windows XP. This should now be possible due to the valid Windows XP Activation Code you entered earlier in the installation process.
 Clean Install XP
Windows XP Activation
- Ensure Microsoft Windows XP Updates (Automatic Updates) is set up so your computer downloads and installs any additional patches released by Microsoft since the release of Service Pack 3.
This takes some time as SP3 was released in June 2008. That's around 6 years worth of additional updates to apply! - Consider using the Windows Classic theme with no wallpaper. Clunky XP Themes and large sized wallpapers all take up computing resource, impacting your computers performance.
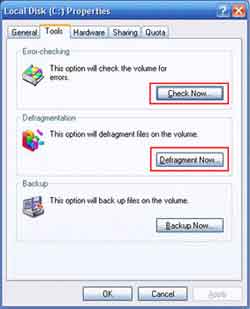
A minimalist approach here pays dividends in the long run. - Open Windows Explorer, Right-Click your C:\ Drive, select Properties, then the Tools tab, and select:
The Check Now... Button under the Error-Checking heading (Scan Disk)
The Defragment Now... Button under the Defragmentation heading
 Clean Install XP
Local Disk Properties
- Finally, start installing your applications
Return to the Table of Contents
Clean Install XP | Final Thoughts
I hope you enjoyed this tutorial series, and more importantly, it enables you to take the brave step and install an Operating System yourself.
eHow provides a good overview of the XP Home Edition installation process.
- Home
- Articles | Microsoft
- Clean Install XP
