- Home
- Troubleshooting
- PC Tool Kit
PC Tool Kit | Hardware Testers
Stephen Harrison B.Sc. (Hons), M.Sc., MBCS, CITP
Essential PC tool kit items for anyone who is serious about fixing their machines are hardware testers.
The hardware testers covered in this article are for testing internal hardware components. It is useful when troubleshooting to have the right equipment that helps to pinpoint and formally diagnose the issue.
This is often the difficult step. The easy step is usually applying the fix, whether it be replacing a Power Supply Unit, or faulty hard drive.
Although troubleshooting hardware can typically be the difficult step, I find it the most interesting and enjoyable aspects of computing. There's nothing better than getting your hands dirty and rising to the challenge.
This article guides you through the main hardware testers I have in my PC tool kit bag and includes pointers on how to use them. Here, we cover the following testing devices:-
- Multimeter (Also known as a Multi Tester);
- Voltage Detector (Also known as a Voltage Tester);
- Power Supply Unit (PSU) Tester;
- Power On Self Test (POST) Tester;
- Cable Tester;
- Other Testers.
Keep up with the latest news and developments
Sign up to the eComputerZ Newsletter
The free A to Z of performing BIOS updates guide that anyone can follow.
✔ A checklist of important actions to perform throughout the update process.
✔ Further supporting information to aid your update plans.
✔ My unique approach for sourcing the latest BIOS versions for any motherboard manufacturer.
Sign up below for instant access to the guide, or by going to the Subscription page for more details.
I never share information with third parties and your details are secure.
I aim to issue newsletters at the start of each month.
Contents
Multimeter (Multi Tester)
A multimeter is an advanced form of power testing for everyday computer users. I've included this tool because for those who know how to use multimeters, it is an essential part of their PC tool kit.
Used properly, multimeters show whether your power supply, for example, is working correctly and whether the electrical output voltage is within the accepted tolerance ranges.
Once your power supply or other equipment is tested, they can either be ruled out as the cause of your issue, or confirmed as the culprit. If confirmed, they can easily be replaced.
The first thing to do before using this tool is make sure both the equipment to be tested and yourself are properly grounded.
Always make sure you take all necessary safety precautions as described in the PC Repair Tools article, before working with electrical devices. Electricity can kill you!
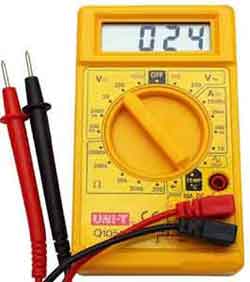 Digital Multimeter (DMM)
Source:- Allgsmtips.com
It is essential to use a Digital Multimeter, as shown above, rather than an older analogue or needle-based multimeter.
This is because older models inject 9v (Volts) in to the circuit when measuring resistance, and this can damage your components. DMM's use 1.5v, which is OK for computer circuits.
I use a multimeter to check items such as CR232 Lithium-ion batteries, Power Supply Units, Motherboards and individual wires.
It is important to pick the right multimeter. My preference list includes:
- Pocket sized for easy transportation;
- Auto-ranging so the correct voltage or resistance is auto-selected;
- Detachable probe leads to prevent damage;
- Overload protection in case I connect to equipment the multimeter is incapable of measuring;
- Audible continuity test to confirm the probe leads are connected properly and working;
- Auto-power off in case I forget to switch off after use and drain the batteries.
If you have never used a multimeter before, and are keen to learn, watch the video below. This is an excellent introduction on how to set up, use and interpret the results correctly and safely.
PC Tool Kit
How To Use A Multimeter In 5 Minutes
Return to the Table of Contents
Voltage Detector (Voltage Tester)
Voltage detectors or testers are a great tool for detecting whether a wire is live or not. They are much safer than multimeters for novice cable testers, but provide basic information only.
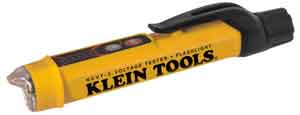 Non-Contact Voltage Tester
To use, you simply switch on and point the probe tip at the cable in question. A bright-green LED indicates the voltage detector is operational. A bright red LED and warning tone provide notification there is voltage detected in the cable.
Make sure the component in question has power running through it before commencing testing, e.g. if it is a PSU cable you are testing, make sure the PSU is plugged in and switched on.
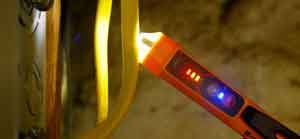 Non-Contact Voltage Tester In Action
Using a voltage detector is a good first step when troubleshooting power issues, and should be included in your PC tool kit.
Return to the Table of Contents
PSU Tester
A Power Supply Unit (PSU) Tester has multiple ports for testing different connectors, including motherboards and hard disk drives. I own an older tester but if I was buying one today I would recommend the TooGoo Power Supply Tester. It is cheap, efficient, and it gets the job done.
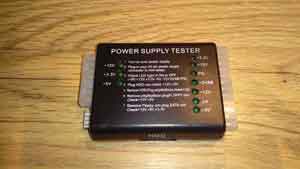 Leegoal 20 / 24-pin Power Supply Tester
PSU testers are easy to use. The following steps walk you through how I perform the power tests and interpret the results.
I assume you have taken the appropriate security steps before undertaking this task, e.g. unplugged your device and earthed yourself with an ESD strap.
1. Open your machine and unplug all the PSU connectors. The connector we are interested in here is the 20-pin Molex motherboard connector.
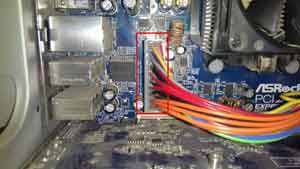 20-Pin Motherboard Power Connector
2. Plug the Molex connector into the appropriate socket on the PSU tester, as depicted below. Make sure it is connected properly.
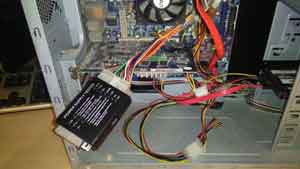 Power Supply Tester Connected To PSU Connector
3. Plug your machine in to the mains and switch on. If your Power Supply to the motherboard is working properly, 7 green lights appear on the display. This is the range of voltages the PSU can deliver.
Don't worry if the -5V light does not switch on. This is removed from modern PSU's. The reason is it powered ISA cards via ISA expansion slots, which are now redundant.
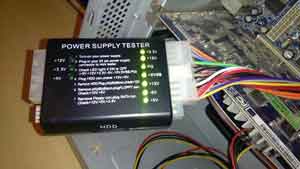 Power Supply Test Results
4. Switch off your device and unplug from the mains. You can remove the 20-pin motherboard connector or not before connecting your Hard Disk Drive Molex. Modern computers use SATA drives.
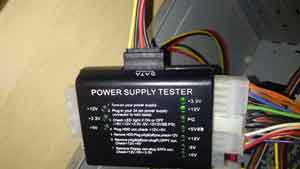 Power Supply Tester With Hard Drive Connected
5. Plug your device into the mains and switch on. The +12V and +5V lights on the opposite side should light up.
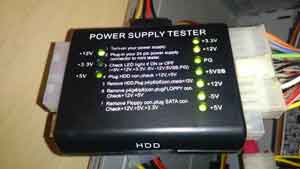 PC Tool Kit
Power Supply Tester Hard Drive Results
6. Switch off and unplug your device. Unplug all Molex connectors from your PSU tester and plug back in to your machine (if all tests are successful). Next we look at how to use a POST tester.
Return to the Table of Contents
POST Tester
A Power On Self Test (POST) adapter is an essential part of your PC tool kit. It is used to test the motherboard, CPU, RAM, Integrated Graphics Card and other internal hardware components (but NOT the Power Supply Unit, which needs a different testing device).
The following steps show how I use a POST tester. In this example, I show the POST test process itself and the boot process.
1. Acquire a POST Tester (or PC Analysis Card/Motherboard Tester). I use the Sourcing map analyser card.
It should look like mine with different card slot or port connectors, which makes the card compatible with multiple motherboard expansion slots. It should also come with an LED display and LED lights to provide you with the results of your testing.
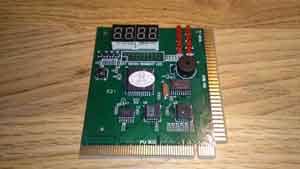 Motherboard PCI/POST Diagnostic Card
2. Follow electrical safety techniques and insert your POST card in to an appropriate PCI slot.
3. Switch on your machine. Your POST card displays a variety of codes as it monitors the POST and boot processes. Different cards can display slightly different codes, so please refer to your POST card manual to interpret your results.
In the video I made below, I show what happens when you switch your machine on.
PC Tool Kit | POST Card In Action Video
4. In this instance, the following results are observed:-
- Code 3387 displayed. This indicates a BIOS check is in progress;
- Code 2900 displayed. This indicates the BIOS check is successful;
- Code AA00 displayed. This indicates the Bootstrap process is successful, and the Operating System is loading successfully.
One of the downsides of this type of card is the 4 digit display is on the 'wrong side' to see it easily. Fortunately, it also has a 2 digit display on the opposite side which shows coded outcomes. The image below shows the results of the PCI port test.
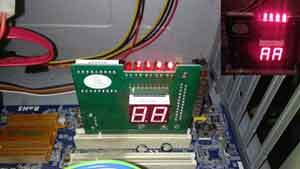 PCI Test Result
Return to the Table of Contents
Cable Tester
A cable tester is another essential item for your PC tool kit. Although more devices today are wireless enabled, there is still huge demand for wired network connectivity such as router access to the Internet (or ISP) and certain older networked peripherals like printers.
Cable testers are generally capable of testing the following cable types:-
- RJ45 (Ethernet cables - the most common cable type for routers etc.);
- RJ11 (Old analogue telephone cables);
- ISDN (Integrated Services Digital Network, which is a legacy form of network connectivity).
Cable testers are also straightforward to use. A typical tester is depicted below.
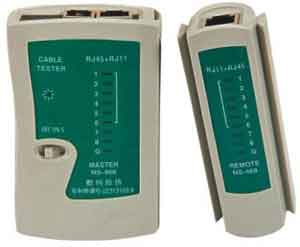 Typical RJ45/RJ11 Cable Tester
Cable testers come in two parts; Master and Remote. Connect each end of your Ethernet cable to each part of the tester and switch on.
If the cable is working properly, all the lights on each part of the tester lights up. If there is an issue with a cable pair, the appropriate LED relating to that cable pair will not light up.
This enables you to either repair the cable, or dispose and replace with a working cable.
Ethernet cables are cheap; therefore, most people will replace with a new cable. There are ways and means to fix Ethernet cables, but is not covered by this tutorial.
Briefly, each of the 8 cable pairs has a task, such as transmitting data and receiving data. Each cable pair is uniquely colour co-ordinated, so they can be terminated or crimped to the right pins in the RJ45 plug.
Often cables stop working because something heavy is sitting on them, such as a table leg, or there is a fold in the cable which breaks the communication cabling inside the protective cabling jacket or sheath.
Return to the Table of Contents
Other Testers
Other types of testers are on the market that you could add to your PC tool kit. However, some are for use by specialist computing professionals only.
This is exemplified by a Fluke Network Tone and Probe kit, also known as a Fluke Tester.
Briefly, these testers check Ethernet and fibre cabling in corporate networks. They measure details such as cable attenuation and cross-talk; and produce reports for quality assurance purposes. This could be for a new corporate network infrastructure.
Another tester that is of interest is a POST card with LPT (Parallel) and USB Port testers included.
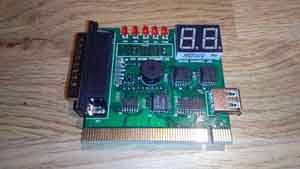 Desktop and Laptop USB and PCI Tester
LPT ports are now classed as legacy. They were used for old printers, which are now either wireless or USB connected. The USB port is used to connect the card to a Laptop.
If you find your machine does not always boot up successfully, freezes for prolong periods of time or shuts down unexpectedly, this type of card tester is just what you need.
Return to the Table of Contents
PC Tool Kit | Final Thoughts
There are several essential testers to consider for inclusion in your PC tool kit. Decide what is relevant to you and how far you want to go in troubleshooting hardware components.
As with all things in life, nothing beats practising yourself. Get the equipment and give it a go. That's the best way to learn, and we all started somewhere!
The video below is a great tutorial on how to use a digital power supply tester and multimeter.
PC Tool Kit | How To Use A PSU Tester Video
- Home
- Troubleshooting
- PC Tool Kit
