Loading…
The Definitive WiFi Troubleshooting Guide For Wireless Devices
WiFi troubleshooting knowledge and techniques are an increasingly important skill in our ever-evolving wireless, technical world.
If I am experiencing issues, I'll check the device I am using first, such as the service's and device drivers. This is the theme of this article.
If I am unable to find the problem with the device, I'll then check my wireless services, such as the router's physical connections, or the Internet Service Provider's (ISPs) status page, for any known issues at their end.
Join The Human Byte — get the free BIOS Update A-to-Z guide
- Follow a safe, step-by-step BIOS update process
- Printable checklist + pitfalls to avoid
- Monthly email with practical PC tips.
- I only use your e-mail for the newsletter. Unsubscribe anytime.
Contents
Is Your Device's Wi-Fi Service Enabled?
All good computer technician's will advise checking the obvious issues first. This is because they are the most common cause of most issues they deal with.
All wireless enabled devices need to have their Wi-Fi service enabled before it will work. Often, Laptop devices will have a physical button on their keyboard to enable or disable wireless services, along with a corresponding light to signify its state.
 WiFi Troubleshooting
Laptop Wireless Button With Red Disabled Light
(Blue Equals Enabled)
Source:- superuser.com
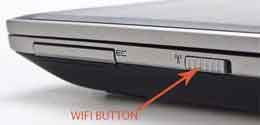
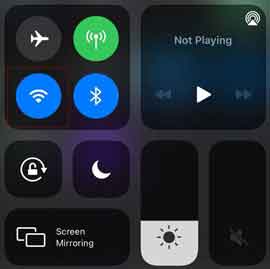
Some older devices have a physical button on the side to enable or disable wireless services. In addition, mobile devices such as Apple iPhones also have methods to enable or disable wireless services.
 WiFi Troubleshooting
Laptop Wireless Slider Button
Source:- accatech.com
 WiFi Troubleshooting
Apple iPhone Quick Wireless Setting Change
Make sure you have your respective device's wireless service enabled, and ensure you are in a position to receive a good, strong signal to test connectivity and then performance.
If you are still not connected, do a quick check of your Operating System to ensure services are enabled correctly.
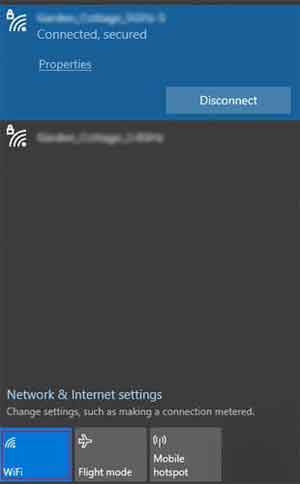
For example, left-click or tap the wireless icon in your Microsoft Windows system tray to ensure your Wi-Fi button is showing services are enabled. Here, you can also confirm your device is within range by checking the list of available networks, or SSID's (also known as "Service Set Identifiers").
If the required SSID is showing as disconnected, select the connect button. Make sure the right network is selected. Check the name and spelling, and ensure you are entering the right password.
 WiFi Troubleshooting
Microsoft Windows Wireless Service Check
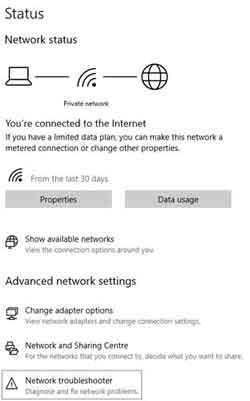
If you suspect a software issue in Microsoft Windows, search for "network status" (without quotations marks).
From here, you can check your network status, and select the Network troubleshooter option at the bottom of the screen. In modern operating systems, inbuilt troubleshooting tools are much better than they were just a few years ago.
 WiFi Troubleshooting
Microsoft Windows Network Status
Return to the Table of Contents
Connecting To Wireless Networks Automatically
There are options to enable your Windows-based devices to connect automatically to preferred wireless networks, which can be convenient when moving between different locations and different networks.
To check the status of this service on your device select Ctrl + R then type in "services.msc" (without quotations).
From here, scroll down the list of services until you see WLAN AutoConfig. The Status should be set to Running, and the Startup Type set to Automatic.
Double left-click or tap to open the service properties. Click or tap the Start button if the service is disabled. Then, if the status or startup type is not set to automatic, select this option from the drop-down menu and click OK.
Next, reboot your device and see if your device can connect to your preferred wireless network.
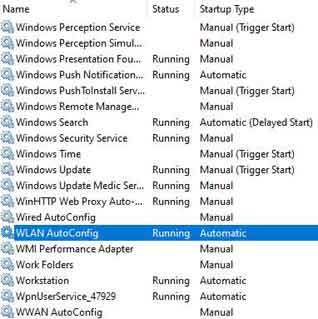 WiFi Troubleshooting
Microsoft Windows WLAN AutoConfig Service Option
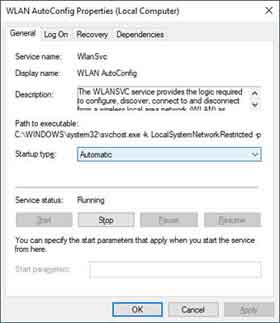 WiFi Troubleshooting
Microsoft Windows WLAN AutoConfig Service Settings
This WLAN AutoConfig service is usually enabled by default. However, although it is still worth checking, ensure you have taken the appropriate cyber security measures, otherwise you may be putting your device, and therefore yourself, at risk of cyber crime.
Return to the Table of Contents
Ruling Out Any Service Blocks
Occasionally, security software can be a little overzealous, and block legitimate network traffic. I'm sure we all prefer this to the alternative, which would put us at unnecessary risk.
For example, the native Microsoft Windows Firewall can be checked to determine if this is the cause of your device's connectivity issues. We can temporarily switch the Firewall off and test connectivity, and check the Firewall rules to confirm that wireless services are not being actively blocked.
However, it is important to note that Firewalls should not be switched off, albeit temporarily, without assurance that your other security tools, such as anti-virus products, will do a sufficient job of keeping your device secure during the testing stage.
To load the Firewall on a Microsoft Windows device, select Ctrl + R and type "firewall.cpl" (without quotations).
From here, you can select the Turn Windows Defender Firewall on or off option. If you find Wi-Fi services start working, the next step is to switch the Firewall back on, and then select Allow an app or feature through Windows Defender Firewall.
Here you can confirm that your wireless services are being allowed through the Firewall. If any of the checkboxes on the right-hand side are not ticked, then check them and click or tap OK to apply. Retest your Wi-Fi connectivity.
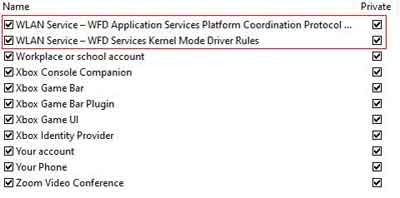 WiFi Troubleshooting
Microsoft Windows Firewall WLAN Settings
Return to the Table of Contents
Wireless Device Driver Checks
If your WiFi troubleshooting is still drawing a blank at this stage, the next logical step is to check the device drivers for any issues, such as outdated drivers with known issues that affect connectivity, to driver corruption.
You have a choice to either let the operating system reinstall the drivers from its database, or find the latest version of the drivers from the WLAN driver manufacturer.
My recommendation is to use the manufacturer's drivers whenever possible. They tend to be more stable and often come with additional features such as management programs, which can help manage the device settings a little easier than through the O/S.
Search and open "Device Manager" (without quotations), then search for Network adapters in the device list. Expand the list to find the wireless driver (See image below from my Laptop).
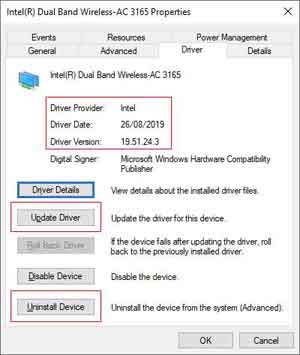
Double-left click the driver and click the driver tab to see the driver manufacturer, ad driver date and version. The second image below from my Laptop shows a date of 2019, which suggests this is an older diver, and a likelihood that a later driver version has been released.
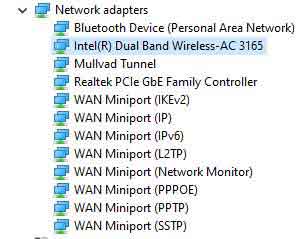 WiFi Troubleshooting
Microsoft Windows Wireless Drivers
 WiFi Troubleshooting
Microsoft Windows Wireless Driver Settings
Before finding the latest driver version, you could uninstall the device by left-clicking the Uninstall Device button. Restart your device and let the operating system source and reinstall the drivers for you. Test to see if this has resolved the issue.
If not, then source and install the manufacturer's latest driver release. In my case, this is straightforward because the Laptop come with the Lenovo Vantage application, which searches for and presents the latest drivers for my automatically.
Return to the Table of Contents
What About Mobile Devices?
Mobile devices including Apple iPhones and iPads can experience similar wireless connectivity issues like more traditional devices such as Laptops and Desktop Computers.
I have an older iPhone 6 and experience frequent wireless disconnections, especially in other parts of my home where I have extended wireless coverage by using extra routers.
I often have to perform a forced reboot of my smartphone to establish a new connection to my home broadband service. I've only once knocked on Airplane mode once.
I once had a major issue with my iPhone connecting to the home broadband service, only to find I had forgotten to knock off Airplane mode after charging (Doing this speeds up the charging process). Don't make the same silly mistake I did.
How you perform a forced reboot of your smartphone depends on the make and model. For my older iPhone 6 I simply hold the off button and home button's together for about 10 seconds.
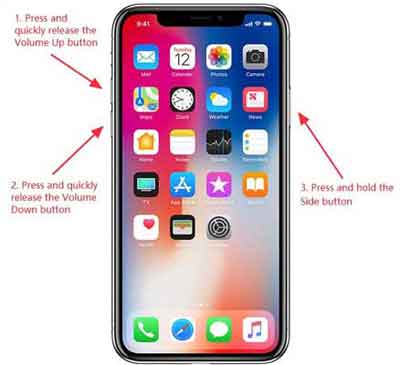
Later iPhone models require a quick press of the volume increase button, the volume decrease button, before holding the side/power button down for several seconds. Give it a go and hopefully, your issue will be solved.
 WiFi Troubleshooting
Modern iPhone Forced Reboot Instructions
Source:- drivereasy.com
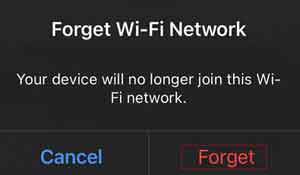
If a forced reboot does not resolve your issue, you could try forgetting the problematic wireless network. This effectively wipes the network from your smartphone, and can be newly discovered again, with (hopefully) the fix included that resolves the connectivity issue for you.
On the iPhone 6 you go to Settings > WiFi then tap the SSID that is causing you an issue, then tap the Forget This Network option. Tap the Forget button, then wait for 10 seconds or so, before going back into the WiFi option, then rejoin the SSID of interest.
 WiFi Troubleshooting
Forget Wireless Network On The iPhone Example
If forgetting specific networks does not resolve your issues, you can try resetting the smartphones WiFi settings. This effectively forgets all of your current and previous wireless networks, so make sure you have the names and passwords to hand to reconnect.
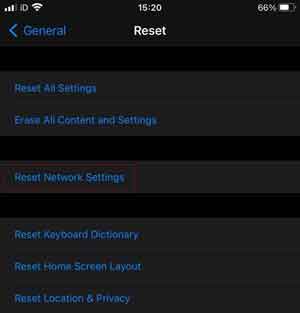
On the Apple iPhone, go to Settings > General, then Reset. From the resulting menu, select the Reset Network Settings option, and enter your Passcode. From here, rejoin your wireless network and test to see if this resolves your issue.
 WiFi Troubleshooting
Reset Network Settings On The Apple iPhone
Next on the troubleshooting list is to try a different DNS, or Domain Name Server. This is a useful test because a different DNS can help with online performance issues.
DNS servers resolve Domain Names, such as google.com to an IP address that IT equipment understands.
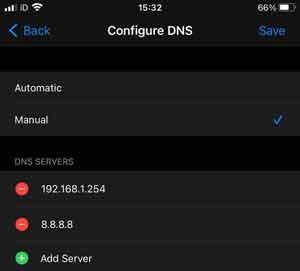
Google offers a free DNS service, using the IP Address 8.8.8.8, which is easy to remember. If you want to try this on your iPhone, tap Settings > WiFi, then the wireless network of interest.
Scroll down the menu list and tap Configure DNS, then the Manual option. Tap Add Server and enter the Google DNS address of 8.8.8.8.
 WiFi Troubleshooting
Configure DNS On The iPhone With The Google DNS Server Address
Finally, if all else fails, you can switch on a service called Wi-Fi Assist, which switches your device automatically to using your mobile data for Internet access, when your Wi-Fi network is being problematics
- Tap General > Mobile Data > Wi-Fi Assist
However, ensure you have sufficient data to cope with your online activities, otherwise you could end up incurring charges for overuse. Make sure only essential applications can use your mobile data when enabled.
It is worth taking a look at the WiFi not working article from Android Authority for further smartphone advice and guidance.
Return to the Table of Contents
WiFi Troubleshooting | Final Thoughts
I hope the WiFi troubleshooting advice and guidance has proven to be helpful, and resolved your wireless issue(s) for you.
There is another, more extreme set of steps, you could consider taking to resolve your wireless connectivity issues. These include updating the firmware on your device.
As you are poking about the firmware settings, try disabling the wireless service in the BIOS. Boot your device, the shutdown, and re-enable in the BIOS. Start your device up and see if this resolves the issue.
Conversely, if the wireless antenna inside your device is faulty, it could be the time to replace the antenna (for a computer, or even a Laptop with an external WiFi dongle), or the device itself, especially if the device is getting long in the tooth.
Consider re-installing the operating system, or resetting the O/S to the Factory Default. However, at this stage it is unlikely this will resolve your issue.
For additional support, take a look at the WiFi troubleshooting articles from Broadband Now and Digital Trends. There is also an excellent article from the Internet Advisor regarding the Troubleshooting of Your Home Internet Connection, which includes WiFi troubleshooting.